*This post MAY contain affiliate links. That means that if you make a purchase after clicking on a link I may earn a small commission at no extra cost to you. I don’t ever recommend something that I don’t use myself. Not all links are affiliate links. For more information, see our Privacy Policy.
Burma Shave Signs
The Verse by the Side of the Road
Remember the Burma-Shave signs? Burma Shave roadside signs captivated highway travelers all over the country from the 1920s till the 1950s. The Burma-Shave signs came about after a similar product, known as Burma-Vita, began losing sales because of poor marketing strategies and an increase in competition.
Burma-Vita, a family-owned company started by a lawyer in the 1920s to sell liniment, became Burma-Shave as his sons and grandsons that looked to the future and created a brushless shaving cream introduced one to the market in 1927.

Things were slow in the early days of the company. They almost didn’t survive because of a lack of strategic marketing tactics. Allan soon came up with a way to advertise their product from gas station signs which informed travelers that gas, oil, and restrooms were ahead. The signs began to develop their distinct humor and surprise endings and soon became a joyful addition to America’s highways.

As road conditions improved and cars became faster, concern increased over the increase in automobile accidents. Burma-Shave started a public service campaign by making signs that reflected the need for slower speeds as well as the need to pay attention to other drivers on the road. A study of average highway speeds conducted by the University of Pennsylvania reported that nothing slowed down speeders more reliably than a set of Burma Shave signs.


By the 1960s, times had changed. America was blanketed by superhighways and faster cars. The shaving cream that smelled like soap and its white-on-red highway signs of verse had fallen by the wayside. In 1963 the Odell Family sold their company to Philip Morris, Inc. The conglomerate decided the verses were a silly idea, and that other types of advertising would sell more products. Today one of the last Burma Shave signs has been preserved in the Smithsonian museum in Washington.
At one time, there was over 7000 signs Burma Shave on the roadside.
Here are only a few of the sayings we could track down.
| 1929 – 1939 | 1940 – 1949 | 1950 – 1960 | |||||
| Your shaving brush Has had its day So why not Shave the modern way With Burma-Shave (1929) |
His face Was loved By just his mother He Burma-Shaved And now– Oh, brother (1940) |
His crop of Whiskers Needed reaping That’s what kept His Lena leaping Burma-Shave (1950) |
|||||
| Every shaver Now can snore Six more minutes Than before By using Burma-Shave (1929) |
Substitutes and Imitations Send ’em to Your wife’s Relations Burma-Shave (1940) |
A whiskery kiss For the one You adore May not make her mad But her face will be sore Burma-Shave (1950) |
|||||
| Does your husband Misbehave Grunt and grumble Rant and rave Shoot the brute some Burma-Shave (1930) |
College cutie Pigskin hero Bristly Kiss Hero Zero Burma-Shave (1940) |
The whale Put Jonah Down the hatch But coughed him up Because he scratched Burma-Shave (1950) |
|||||
| Are your whiskers When you wake Tougher than A two-bit steak? Try Burma-Shave (1930) |
A scratchy chin Like bright pink socks Puts any romance On the rocks Burma-Shave (1940) |
Her chariot Raced 80 per They hauled away What had Ben Her Burma-Shave (1950) |
|||||
| Hinky-dinky Parley voo Cheer up the face The war Is thru Burma-Shave (1930) |
A Christmas hug A birthday kiss Awaits The woman Who gives this Burma-Shave (1940) |
Bracing as An ocean breeze For after shaving It’s sure To please Burma-Shave Lotion (1950) |
|||||
| Early to rise Was meant for those Old fashioned guys Who didn’t use Burma-Shave (1930) |
Always remember On any trip Keep two things Within your grip Your steering wheel and Burma-Shave (1940) |
A guy who drives A car wide open Is not thinkin’ He’s just hopin’ Burma-Shave (1950) |
|||||
| The 50 cent jar So large By heck Even the Scotch Now shave the neck Burma-Shave (1930) |
Approached a crossing Without looking Who will eat His widow’s cooking? Burma-Shave (1940) |
The wife Who keeps on Being kissed Always heads Her shopping list Burma-Shave (1950) |
|||||
| Tho stiff The beard That Nature gave It shaves like down With Burma-Shave (1930) |
Don’t pass cars On curve or hill If the cops Don’t get you Morticians will Burma-Shave (1940) |
To kiss A mug That’s like a cactus Takes more nerve Than it does practice Burma-Shave (1950) |
|||||
| Take a tip For your trip No wet brush To soak Your grip Burma-Shave (1931) |
Drove too long Driver snoozing What happened next Is not Amusing Burma-Shave (1940) |
To change that Shaving job To joy You gotta use The real McCoy Burma-Shave (1950) |
|||||
| The one horse shay Has had its day So has the brush And lather way Use Burma-Shave (1931) |
Famous last words “If he won’t Dim his I won’t Dim mine” Burma-Shave (1940) |
Twinkle, twinkle One-eyed car We all wonder WHERE You are Burma-Shave (1950) |
|||||
| Tho tough And rough From wind and wave Your cheek grows sleek With Burma-Shave (1931) |
First men buy it Then apply it Then advise Their friends To try it Burma-Shave (1940 |
Use Burma-Shave In tube Or jar Then follow up With our new star Burma-Shave Lotion (1950) |
|||||
| Golfers! If fewer strokes Are what you crave You’re out of the rough With Burma-Shave (1931) |
Give hand signals To those behind They don’t know What’s in Your mind Burma-Shave (1940) |
Violets are blue Roses are pink On graves Of those Who drive and drink Burma-Shave (1950) |
|||||
| Shaving brush All wet And hairy I’ve passed you up For sanitary Burma-Shave (1931) |
Guys whose eyes Are in Their backs Get halos crossing Railroad tracks Burma-Shave (1940) |
The blackened forest Smolders yet Because He flipped A cigarette Burma-Shave (1950) |
|||||
| Take a tip For your trip No wet brush To soak Your grip Burma-Shave (1931) |
He married Grace With scratchy face He only Got one day Of Grace! Burma-Shave (1940) |
The whale Put Jonah Down the hatch But coughed him up Because he scratched Burma-Shave (1950) |
|||||
| A shave That’s real No cuts to heal A soothing Velvet after-feel Burma-Shave (1932) |
He saw The train And tried to duck it Kicked first the gas And then the bucket Burma-Shave (1940) |
The whale Put Jonah Down the hatch But coughed him up Because he scratched Burma-Shave (1950) |
|||||
| The cannoneers With hairy ears On wiry whiskers Used tin shears Until they found Burma-Shave (1932) |
He’s the boy The gals forgot His line Was smooth His chin was not Burma-Shave (1940) |
Burma-Shave Was such a boom They passed The bride And kissed the groom (1950) |
|||||
| A shave That’s real No cuts to heal A soothing Velvet after-feel Burma-Shave (1932) |
Headline news For face And chin Now improved With lanolin Burma-Shave (1940) |
Candidate says Campaign Confusing Babies kiss me Since I’ve been using Burma-Shave (1950) |
|||||
| Political pull May be Of use For razor pull There’s no excuse Burma-Shave (1932) |
Said Juliet To Romeo If you Won’t shave Go homeo Burma-Shave (1940) |
His cheek Was rough His chick vamoosed And now she won’t Come home to roost Burma-Shave (1950) |
|||||
| You’ll love your wife You’ll love her paw You’ll even love Your mother-in-law If you use Burma-Shave (1932) |
No man can really Do his stuff With a face that’s sore Or a chin That’s rough Burma-Shave (1940) |
If your peach Keeps out Of reach Better practice What we preach Burma-Shave (1950) |
|||||
| Give the guy The toe of your boot Who tries To hand you A substitute for Burma-Shave (1932) |
Stores are full Of shaving aids But all you need Is this And blades Burma-Shave (1940) |
Missin’ Kissin’? Perhaps your thrush Can’t get thru The underbrush–try Burma-Shave (1950) |
|||||
| For painting
cow-shed Barn or fence That shaving brush Is just immense Burma-Shave (1932) |
Sleep in a chair Nothing to lose But a nap At the wheel Is a permanent snooze Burma-Shave (1940) |
No use Knowing How to pick ’em If your half-shaved Whiskers stick ’em Burma-Shave (1950) |
|||||
| Shaving brush Don’t you cry You’ll be a Shoe dauber By and by Burma-Shave (1933) |
Put your brush Back on the shelf The darn thing Needs a Shave itself Burma-Shave (1940) |
Dinah doesn’t Treat him right But if he’d Shave Dyna-mite! Burma-Shave (1950) |
|||||
| The answer to A maiden’s Prayer Is not a chin Of stubby hair Burma-Shave (1933) |
Prickly pears Are picked For pickles No peach picks A face that prickles Burma-Shave (1940) |
Clancy’s Whiskers Tickle Nancy Nancy lowered the boom On Clancy! Burma-Shave (1950) |
|||||
| If your hubby Trumps your ace Here’s something That will Save his face Burma-Shave (1933) |
If these Signs blur And bounce around You’d better park And walk to town Burma-Shave (1940) |
She will Flood your face With kisses ‘Cause you smell So darn delicious Burma-Shave Lotion (1950) |
|||||
| Mug and brush Old Adam Had ’em Is your husband Like Adam, Madam? Burma-Shave (1933) |
When frisky With whiskey Don’t drive ‘Cause it’s Risky Burma-Shave (1940) |
He tried To cross As fast train neared Death didn’t draft him He volunteered Burma-Shave (1950) |
|||||
| It’s not toasted It’s not dated But look out — It’s imitated Insist on Burma-Shave (1933) |
When you drive If caution ceases You are apt To rest In pieces Burma-Shave (1940) |
Doesn’t Kiss you Like she useter? Perhaps she’s seen A smoother rooster!! Burma-Shave (1950) |
|||||
| He played A sax Had no B.O. But his whiskers scratched So she let him go Burma-Shave (1933) |
It’s best for One who hits The bottle To let another Use the throttle Burma-Shave (1940) |
My job is Keeping faces clean And nobody knows De stubble I’ve seen Burma-Shave (1950) |
|||||
| Ruddy cheeks And face Of tan Neatly shaven What a man! Burma-Shave (1933) |
Just spread Then pat Now shave That’s That Burma-Shave (1940) |
His brush is gone So what’ll we do Said Mike Robe I To Mike Robe II Burma-Shave (1950) |
|||||
| When cutting Whiskers You don’t need To leave one half Of them for seed Burma-Shave (1933) |
You can beat A mile a minute But there ain’t No future In it Burma-Shave (1940) |
This cooling shave Will never fail To stamp Its user First class male Burma-Shave (1950) |
|||||
| He had the ring He had the flat But she felt his chin And that Was that Burma-Shave (1934) |
You can’t reach 80 Hale and hearty By driving 80 Home from The party Burma-Shave (1940) |
Dinah doesn’t Treat him right But if he’d Shave Dyna-mite! Burma-Shave (1950) |
|||||
| Jonah took No brush To mop his face Where Jonah went He needed space Burma-Shave(1934) |
You’ve used Our cream Now try our blades Pair up the best In shaving aids Burma-Shave (1940) |
His crop of Whiskers Needed reaping That’s what kept His Lena leaping Burma-Shave (1950) |
|||||
| Your beauty, boys Is just Skin deep What skin you’ve got You ought to keep Burma-Shave(1934) |
College cutie Pigskin hero Bristly Kiss Hero Zero Burma-Shave (1940) |
The draftee Tried a tube And purred Well whaddya know I’ve been defurred Burma-Shave (1950) |
|||||
| The answer to A shaver’s dream A greaseless No brush Shaving cream Burma-Shave(1934) |
This is not A clever verse I tried And tried But just Got worse Burma-shave (1940) |
The wife Who keeps on Being kissed Always heads Her shopping list Burma-Shave (1950) |
|||||
| Bachelor’s quarters Dog on the rug Whiskers to blame No one To hug Burma-Shave(1934) |
The bearded devil Is forced To dwell In the only place Where they don’t sell Burma-Shave (1940) |
Is he Lonesome Or just blind– This guy who drives So close behind? Burma-Shave (1950) |
|||||
| Bristly beard Or silky
fuzz Just shave ’em back To where They was Burma-Shave(1934) |
Headline news For face And chin Now improved With lanolin Burma-Shave (1940) |
His cheek Was rough His chick vamoosed And now she won’t Come home to roost Burma-Shave (1950) |
|||||
| Beneath this stone Lies Elmer Gush Tickled to death By his shaving brush Burma-Shave (1934) |
He’s the boy The gals forgot His line Was smooth His chin was not Burma-Shave (1940) |
Clancy’s Whiskers Tickle Nancy Nancy lowered the boom On Clancy! Burma-Shave (1950) |
|||||
| Every second Without fail Some store Rings up Another sale Burma-Shave (1934) |
Drove too long Driver snoozing What happened next Is not Amusing Burma-Shave (1940) |
These signs We gladly Dedicate To men who’ve had No date of late Burma-Shave (1950) |
|||||
| The bearded lady Tried a jar She’s now A famous Movie star Burma-Shave(1934) |
Don’t pass cars On curve or hill If the cops Don’t get you Morticians will Burma-Shave (1940) |
A guy Who drives A car wide open Is not thinkin’ He’s just hopin’ Burma-Shave (1950) |
|||||
| College boys! Your courage muster Shave off That fuzzy Cookie duster Burma-Shave (1934) |
Tell The dear Who shops around That half a buck Buys half a pound Burma-Shave (1941) |
The ladies Take one whiff And purr– It’s no wonder Men prefer Burma-Shave Lotion (1950) |
|||||
| Every day We do Our part To make your face A work of art Burma-Shave(1934) |
They missed The turn Car was whizz’n Fault was her’n Funeral his’n Burma-Shave (1941) |
Bracing as An ocean breeze For after shaving It’s sure To please Burma-Shave Lotion (1950) |
|||||
| The game laws Ought to Let you shoot The bird who hands you A substitute Burma-Shave(1934) |
Gets each Whisker At the base No ingrown hair On neck or face Burma-Shave (1941) |
The place to pass On curves You know Is only at A beauty show Burma-Shave (1950) |
|||||
| Noah had whiskers In the ark But he wouldn’t get by On a bench In the park Burma-Shave (1934) |
From Bar To Car To Gates ajar Burma-Shave (1941) |
Pedro Walked Back home by golly His bristly chin Was hot-to-Molly Burma-Shave (1950) |
|||||
| Dewhiskered Kisses Defrost The Misses Burma-Shave(1935) |
He used Umbrella For parachute Now rejects Every substitute Burma-Shave (1941) |
On curves ahead Remember, sonny That rabbit’s foot Didn’t save The bunny Burma-shave (1950) |
|||||
| Eeny-meeny Miny-mo Save your skin Your time Your dough Burma-Shave(1935) |
She kissed The hairbrush By mistake She thought it was Her husband Jake Burma-Shave (1941) |
Pat’s bristles Scratched Bridget’s nose That’s when Her wild Irish rose Burma-Shave (1951) |
|||||
| Shaving brush Is out of date Use the Razor’s Perfect mate Burma-Shave(1935) |
Here’s A good deed For a scout Tell your dad All about Burma-Shave (1941) |
Proper Distance To him was bunk They pulled him out Of some guy’s trunk Burma-Shave (1951) |
|||||
| Grandpa’s beard Was stiff and coarse And that’s what Caused his Fifth divorce Burma-Shave(1935) |
Don’t stick Your elbow Out so far It might go home In another car Burma-Shave (1941) |
Another Red skin Bit the dust When Pa tried What these signs discussed Burma-Shave (1951) |
|||||
| Avoid the store Which claims You should Buy something else That’s just as good Burma-Shave(1935) |
Remember this If you’d Be spared Trains don’t whistle Because they’re scared Burma-Shave (1941) |
I’d heard It praised By drug store clerks I tried the stuff Hot dog! It works Burma-Shave (1951) |
|||||
| Be a modern Paul Revere Spread the news From ear To ear Burma-Shave(1935) |
If man bites doggie That is news If face Scares doggie Better use Burma-Shave (1941) |
My cheek Says she Feels smooth as satin Ha! Ha! Says he That’s mine you’re pattin’ Burma-Shave (1951) |
|||||
| If you think She likes Your bristles Walk bare-footed Through some thistles Burma-Shave(1935) |
Substitutes Resemble Tail-chasing pup Follow and follow But never catch up Burma-Shave (1941) |
Drinking drivers Don’t you know Great bangs From little Binges grow? Burma-Shave (1951) |
|||||
| Helps Your budget Hold it’s ground Half a dollar Half a pound Burma-Shave(1935) |
Soldier Sailor And marine Now get a shave That’s quick and clean Burma-Shave (1941) |
Cautious rider To her Reckless dear Let’s have less bull And lots more steer Burma-Shave (1951) |
|||||
| Cutie invited Varsity
hop Guy full Of whiskers Party a flop Burma-Shave(1935) |
At intersections Look each way A harp sounds nice But it’s Hard to play Burma-Shave (1941) |
The band For which The grand stand roots Is not made up Substi-toots! Burma-Shave (1951) |
|||||
| Whiskers long Made Samson strong But Samson’s gal She done Him wrong Burma-Shave(1935) |
If every sip Fills you With zip Then your sipper Needs a zipper Burma-Shave (1941) |
Altho insured Remember, kiddo They don’t pay you They pay Your widow Burma-Shave (1951) |
|||||
| It took years To perfect For you A brushless cream That’s greaseless too Burma-Shave(1935) |
When better Shaving brushes Are made We’ll still shave Without their aid Burma-Shave (1941) |
She eyed His beard And said no dice The wedding’s off– I’ll COOK the rice Burma-Shave (1951) |
|||||
| Keep well To the right Of the oncoming car Get your close shaves From the half-pound jar Burma-Shave(1935) |
When Peter Piper Pickle picker Kissed his gal His beard Would prick ‘er Burma-Shave (1941) |
Train approaching Whistle squealing Pause! Avoid that Rundown feeling! Burma-Shave (1951) |
|||||
| The happy golfer Find with glee The shave That suits him To a tee Burma-Shave(1935) |
When junior takes Your ties And car It’s time to buy An extra jar Burma-Shave (1941) |
Spring Has sprung The grass has riz Where last year’s Careless drivers is Burma-Shave (1951) |
|||||
| Tube Immense 35 cents Easy shaving Low expense Burma-Shave(1935) |
Wild Dashes From by-ways Cause crashes On highways Burma-Shave (1941) |
I know He’s a wolf Said riding hood But Grandma dear, He smells so good Burma-Shave (1951) |
|||||
| You know Your onions Lettuce suppose This beets ’em all Don’t turnip your nose Burma-Shave(1935) |
Broken romance Stated
fully She went wild When he Went wooly Burma-Shave (1941) |
The hobo Lets his Whiskers sprout It’s trains–not girls That he takes out Burma-Shave (1951) |
|||||
| I just joined The young man said A nudist camp Is my face red? No! I use Burma-Shave(1935) |
Rhyme and reason Every season You’ve read The rhyme Now try the reason Burma-Shave (1941) |
Soap May do For lads with fuzz Bur sir, you ain’t The kid you wuz Burma-Shave (1951) |
|||||
| Cutie invited Varsity hop Guy full Of whiskers Party a flop Burma-Shave(1935) |
Life is sweet But oh how bitter! To love a gal And then Not git ‘er Burma-Shave (1941) |
Substitutes Can do More harm Than city fellers On a farm Burma-Shave (1951) |
|||||
| His face Was smooth And cool as ice And oh! Louise! He smelled so nice Burma-Shave Lotion (1935) |
The answer to A maiden’s prayer Is a man Most anywhere Using Burma-Shave (1941) |
Unless Your face Is stinger free You’d better let Your honey be Burma-Shave (1951) |
|||||
| Water heater Out of kilter Try the brushless Whisker Wilter Burma-Shave(1935) |
Trains don’t wander All over the
map For no one Sits on The engineer’s lap Burma-Shave (1941) |
Big blue tube It’s a honey Best squeeze play For love Or money Burma-Shave (1951) |
|||||
| With 200 kinds From which to choose 2 million men Prefer To use Burma-Shave(1935) |
Can’t shave daily?
Tender hide? Now be honest Have you Tried Burma-Shave (1942) |
Train wrecks few Reason clear Fireman Never hugs Engineer Burma-Shave (1951) |
|||||
| If substitution He should try Just look that clerk Right in the eye And bellow Burma-Shave(1935) |
Pa acted So tickled Ma thought He was pickled He’d just tried Burma-Shave (1942) |
The wolf Is shaved So neat and trim Red Riding Hood Is chasing him Burma-Shave (1952) |
|||||
| Congressman Pipp Let’s give the Clerk a hand Who never Palms off Another brand Burma-Shave (1936) |
Pa likes the cream Ma likes the jar Both like The price So there you are Burma-Shave (1942) |
We can’t Provide you With a date But we do supply The best darn bait Burma-Shave (1952) |
|||||
| To get Away from Hairy apes Ladies jump From fire escapes Burma-Shave (1936) |
Maybe you can’t Shoulder a gun But you can shoulder The cost of one Buy defense bonds Burma-Shave (1942) |
Better try Less speed per mile That car May have to Last a while Burma-Shave (1952) |
|||||
| Jimmie said a naughty word Jimmie’s
mother overheard Soapsuds? No! He preferred Burma-Shave (1936) |
Iceman’s grandson Now full grown Has cooling system All his own He uses Burma-Shave (1942) |
A chin Where barbed wire Bristles stand Is bound to be A no ma’ams land Burma-Shave (1952) |
|||||
| Cooties love Bewhiskered places Cuties love the Smoothest faces Shaved by Burma-Shave (1936) |
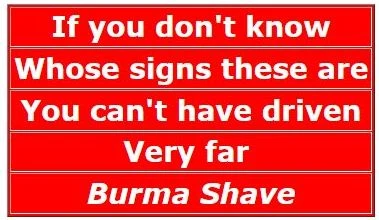
If you Don’t know Whose signs These are You can’t have Driven very far Burma-Shave (1942) |
Leaves Face soft As woman’s touch Yet doesn’t cost you Near as much Burma-Shave (1952) |
|||||
| Your razor Floats thru The hair With the Greatest of ease Burma-Shave (1936) |
Substitutes Like unseen barter Often make one Sad But smarter Burma-Shave (1942) |
Relief For faces Chapped and sore Keeps ’em comin’ Back for more Burma-Shave (1952) |
|||||
| His tenor voice She thought divine Till whiskers Scratched Sweet Adeline Burma-Shave (1936) |
Buying defense bonds Means money lent So they Don’t cost you One red cent Burma-Shave (1942) |
We’ve made Grandpa Look so trim The local Draft board’s after him Burma-Shave (1952) |
|||||
| All these years Your skin Has dried Why not moisten Up your hide Burma-Shave (1936) |
If hugging On highways Is your sport Trade in your car For a davenport Burma-Shave (1942) |
“No, no,” She said To her bristly beau “I’d rather Eat the mistletoe” Burma-Shave (1952) |
|||||
| Special treatment Every hair Holds it up And cuts It square Burma-Shave (1936) |
What you shouted May be true, But Did you hear What he called you? Burma-Shave (1942) |
5-star Generals Privates 1st class Show equal rank In the looking-glass Burma-Shave (1952) |
|||||
| If you And whiskers Do hobnob Some sailor gob Will steal your squab Burma-Shave (1936) |
Of all The drunks Who drive on Sunday Some are still Alive on Monday Burma-Shave (1942) |
His rose Is wed His violet blew But his sugar is sweet Since he took this cue Burma-Shave (1952) |
|||||
| As you journey Down the years Your mirror is The glass that cheers If you use Burma-Shave (1936) |
There’s no whisker It won’t soften Shave ’em close And not So often Burma-Shave (1942) |
Heaven’s Latest Neophyte Signalled left Then turned right Burma-Shave (1952) |
|||||
| If you’re just An average man Wanting to look The best you can Use Burma-Shave (1936) |
A girl Should hold on To her youth But not When he’s driving Burma-Shave (1942) |
A beard That’s rough And overgrown is better than A chaperone Burma-Shave (1951) |
|||||
| Ed’s face Is rough And rugged Ed’s wife Doesn’t hug Ed Burma-Shave (1936) |
Shaving brush In army pack Was straw that broke The rookie’s back Use brushless Burma-Shave (1942) |
To steal A kiss He had the knack But lacked the cheek To get one back Burma-Shave (1952) |
|||||
| Old McDonald On the farm Shaved so hard He broke his arm Then he bought Burma-Shave (1936) |
“At ease,” she said “Maneuvers
begin When you get Those whiskers Off your chin” Burma-Shave (1942) |
Why is it When you Try to pass The guy in front Goes twice as fast? Burma-Shave (1952) |
|||||
| Smith Brothers Would look immense If they’d just Cough up 50 cents For half pound jar Burma-Shave (1936) |
Brother speeders Let’s Rehearse All together “Good morning, Nurse!” Burma-Shave (1942) |
His Tomato Was the mushy type Until his beard Grew over-ripe Burma-Shave (1952) |
|||||
| Shaving brush And soapy smear Went out of Style with Hoops my dear Burma-Shave (1936) |
Let’s make Hitler And Hirohito Look as sick as Old Benito Buy defense bonds Burma-Shave (1942) |
This cream Makes the Gardener’s daughter Plant her tu-lips Where she oughter Burma-Shave (1953) |
|||||
| Riot at Drug store Calling all cars 100 customers 99 jars Burma-Shave (1936) |
To most brush shavers It’s quite clear The yanks aren’t coming The yanks are here Use brushless Burma-Shave (1942) |
The safest rule No ifs or buts Just drive Like every one else Is nuts! Burma-Shave (1953) |
|||||
| The cream Preserves Pa’s razor blade The jar preserves Ma’s marmalade Burma-Shave (1936) |
Traveling men Know ease And speed Their shaving kits Hold what they need Burma-Shave (1942) |
No matter The price No matter how new The best safety device In your car is you Burma-Shave (1953) |
|||||
| To every man His shave Is best Until he makes The final test Burma-Shave (1936) |
It’s a good Old Spanish custom Take your mug And brush And bust ’em Burma-Shave (1943) |
If anything Will please Your Jill A little jack For this jar will Burma-Shave (1953) |
|||||
| Every Sheba Wants a sheik Strong of muscle Smooth of cheek Burma-Shave (1937) |
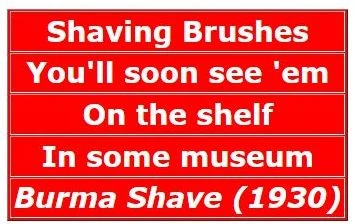
Shaving brushes You’ll soon see ’em On the shelf In some Museum Burma-Shave (1943) |
Toughest Whiskers In the town We hold ’em up You mow ’em down Burma-Shave (1953) |
|||||
| If harmony Is what You crave Then get A tuba Burma-Shave (1937) |
Many a wolf Is never let in Because of the hair On his Chinny-chin-chin Burma-Shave (1943) |
Our fortune Is your Shaven face It’s our best Advertising space Burma-Shave (1953) |
|||||
| Mid rising Taxes Soaring rents Still half a pound For fifty cents Burma-Shave (1937) |
Film protects Your neck And chin So your razor Won’t dig in Burma-Shave (1943) |
We’re widely read And often quoted But it’s shaves Not signs For which we’re noted Burma-Shave (1953) |
|||||
| If HER whiskers Scratched YOUR cheek You would Send her out To seek Burma-Shave (1937) |
Within this vale Of toil And sin Your head grows bald But not your chin — Use Burma-Shave (1943) |
The hero Was brave and strong And willin’ She felt his chin– Then wed the villain Burma-Shave (1953) |
|||||
| Bathroom shelf Surprises me From shaving clutter It’s now free I’m using Burma-Shave (1937) |
Half a pound For Half a dollar Spread on thin Above the collar Burma-Shave (1943) |
Feel your face As you ride by Now don’t You think It’s time to try Burma-Shave (1953) |
|||||
| Salesmen, tourists Camper-outers All you other Whisker-sprouters Don’t forget your Burma-Shave (1937) |
Why does a chicken Cross the street? She sees a guy She’d like to meet He uses Burma-Shave (1944) |
When you lay Those few cents down You’ve bought The smoothest Shave in town Burma-Shave (1953) |
|||||
| Fingers were made Before brushes — Use ’em They’re much safer You can’t lose ’em Burma-Shave (1937) |
Why does a chicken Cross the street? She sees a guy She’d like to meet He uses Burma-Shave (1944) |
These signs Are not For laughs alone The face they save May be your own Burma-Shave (1953) |
|||||
| It’s in The bag Of every man Who travels Lightly as he can Burma-Shave (1937) |
Both hands On wheel Eyes on road That’s the skillful Driver’s code Burma-Shave (1944) |
He asked His kitten To pet and purr She eyed his puss And screamed “What fur!” Burma-Shave (1953) |
|||||
| Substitutes! Smooth guys sell ’em Easy marks use ’em Well groomed men Always refuse ’em Burma-Shave (1937) |
To a substitute He gave a trial It took off Nothing But his smile Burma-Shave (1944) |
Around The curve Lickety-split It’s a beautiful car Wasn’t it? Burma-Shave (1953) |
|||||
| Little Willie Modern soul Busted Papa’s Brush and bowl Nice work Willie Burma-Shave (1937) |
It spreads so smooth It shaves so slick It feels Like velvet And it’s quick Burma-Shave (1944) |
Substitutes Are like a girdle They find some jobs They just Can’t hurdle Burma-Shave (1953) |
|||||
| No pulling At the whisker base A soothing film Protects Your face Burma-Shave (1937) |
Sleep in a chair Nothing to lose But a nap At the wheel Is a permanent snooze Burma-Shave (1944) |
If Crusoe’d Kept his chin More tidy He might have found A lady Friday Burma-Shave (1953) |
|||||
| Paper hangers With the hives Now can Shave with Carving knives Burma-Shave (1937) |
Big mistake Many make Rely on horn Instead of Brake Burma-Shave (1944) |
It gave McDonald That needed charm Hello Hollywood Good-by farm Burma-Shave (1953 |
|||||
| Men Who’ve tested Every brand Are just the ones Who now demand Burma-Shave (1937) |
Twould be More fun To go by air If we could put These signs up there Burma-Shave (1944) |
That barefoot Chap With cheeks of tan Won’t let ’em chap When he’s a man Burma-Shave (1953) |
|||||
| Week-old beard So masked his face His bull dog Chased him Off the place Burma-Shave (1937) |
She raised cain When he raised stubble Guess what Smoothed away Their trouble? Burma-Shave (1944) |
Try a tube Its cooling Power Refreshes like An April shower Burma-Shave (1955) |
|||||
| Drive With care Be alive When you Arrive Burma-Shave (1937) |
Life with father Is more pleasant Since He got this Birthday present Burma-Shave (1944) |
A Christmas hug A birthday kiss Awaits the woman Who gives this Burma-Shave (1955) |
|||||
| The burma girls I n Mandalay Dunk bearded lovers In the bay Who don’t use Burma-Shave (1937) |
The chick He wed Let out a whoop Felt his chin and Flew the coop Burma-Shave (1944) |
Grandpa knows It ain’t too late He’s gone To git Some widder bait Burma-Shave (1955) |
|||||
| You’ve laughed At our signs For many a mile Be a sport Give us a trial Burma-Shave (1937) |
His line was smooth But not his chin He took her out She took him in To buy some Burma-Shave (1944) |
For shaving comfort Without A sting That big blue tube Has everything Burma-Shave (1955) |
|||||
| From Saskatoon To Alabam’ You hear men praise The shave What am Burma-Shave (1937) |
From statistics That we gather The swing is to No brush No lather Burma-Shave (1944) |
Slow down, Pa Sakes alive Ma missed signs Four And five Burma-Shave (1955) |
|||||
| Romances are wrecked Before they
begin By a hair On the coat Or a lot on the chin Burma-Shave (1937) |
Enhance their Chance To highball home In an ambulance Burma-Shave (1944) |
Cattle crossing Means go slow That old bull Is some Cow’s beau Burma-Shave (1955) |
|||||
| Stomach ache! Doctor — Toothache! Dentist — Whiskers! Burma-Shave (1937) |
Tested In peace Proven in war Better now Than ever before Burma-Shave (1944) |
Free ! Free ! A trip To Mars For 900 Empty jars Burma-Shave (1955) |
|||||
| The crowd You see Around that store Are Burma-Shavers Buying more Burma-Shave (1937) |
You can beat A mile a minute But there ain’t No future In it Burma-Shave (1944) |
Jar so big Cost so small Coolest Smoothest Shave of all Burma-Shave (1955) |
|||||
| The cannibals Took just one view And said He looks too nice To stew Burma-Shave (1937) |
The wolf Who longs To roam and prowl Should shave before He starts to howl Burma-Shave (1947) |
The big blue tube’s Just like Louise You get A thrill From every squeeze Burma-Shave (1955) |
|||||
| Cheek to cheek They meant to be The lights went out And so did he He needed Burma-Shave (1938) |
If a gift You must choose Give him One that He can use Burma-Shave (1947) |
Substitutes Can let you down Quicker Than a Strapless gown Burma-Shave (1955) |
|||||
| The cream One hears The most of now Comes from a jar Not from a cow Burma-Shave (1938) |
Car in ditch Driver in tree Moon was full And so Was he Burma-Shave (1947) |
The monkey took One look at Jim And threw the peanuts Back at him He needed Burma-Shave (1955) |
|||||
| A silky cheek Shaved smooth And clean Is not obtained With a mowing machine Burma-Shave (1938) |
In Cupid’s little Bag of trix Here’s the one That clix With chix Burma-Shave (1947) |
One shave lasts All day through Face feels Cool and Smoother too Burma-Shave (1955) |
|||||
| He cried And felt his chin ‘Twas just another Easy win for Burma-Shave (1938) |
A guy Who wants To middle-aisle it Must never scratch His little violet Burma-Shave (1947) |
Take Your Time Not Your life Burma-Shave (1955) |
|||||
| Henry the Eighth Prince of friskers Lost five wives But kept His whiskers Burma-Shave (1938) |
I use it too The bald man said It keeps my face Just like My head Burma-Shave (1947) |
To change that Shaving job To joy You gotta use The real McCoy Burma-Shave (1955) |
|||||
| Don’t take A curve At 60 per We hate to lose A customer Burma-Shave (1938) |
Substitutes That promise perfection Are like Some candidates After election Burma-Shave (1947) |
At a quiz Pa ain’t No whiz But he knows how To keep Ma his Burma-Shave (1959) |
|||||
| Here’s something That could Even soak The whiskers off A radio joke Burma-Shave (1938) |
If you want A hearty squeeze Get our Female Anti-freeze Burma-Shave (1947) |
Don’t leave safety To mere chance That’s why Belts are Sold with pants Burma-Shave (1959) |
|||||
| Other things have Gone sky high Half a dollar Still will buy Half pound jar Burma-Shave (1938) |
Substitutes would Have their place If you could Substitute Your face Burma-Shave (1947) |
At a quiz Pa ain’t No whiz But he knows how To keep Ma his Burma-Shave (1959) |
|||||
| Are you An even-tempered guy? Mad all The time? Better try Burma-Shave (1938) |
Car in ditch Driver in tree Moon was full And so Was he Burma-Shave (1947) |
Men With whiskers ‘Neath their noses Oughta have to kiss Like eskimoses Burma-Shave (1959) |
|||||
| On a highway ad He spied it Bough a jar Now glad he Tried it Burma-Shave (1938) |
Grandpa’s Out with Junior’s date Old technique With brand new bait Burma-Shave (1947) |
Use this cream A day Or two Then don’t call her– She’ll call you Burma-Shave (1959) |
|||||
| If you have A double chin You’ve two Good reasons To begin using Burma-Shave (1938) |
Altho We’ve sold Six million others We still can’t sell Those coughdrop brothers Burma-Shave (1947) |
Passing cars When you can’t see May get you A glimpse Of eternity Burma-Shave (1959) |
|||||
| Fire! Fire! Keep cool Be brave Just grab Your pants and Burma-Shave (1938) |
Don’t lose Your head To gain a minute You need your head Your brains are in it Burma-Shave (1947) |
Baby your skin Keep it fitter Or “baby” Will get Another sitter Burma-Shave (1959 |
|||||
| Rip Van Winkle Said he’d rather Snooze for years Than shave With lather Burma-Shave (1938) |
Man passes Dog house Dog sees chin Dog gets out Man gets in Burma-Shave (1947) |
Drinking drivers– Nothing worse They put The quart Before the hearse Burma-Shave (1959) |
|||||
| Ring out the old Ring in the new What good can Shaving Brushes do? Burma-Shave (1938) |
Thrifty jars for Stay at homes Handy tubes For him Who roams Burma-Shave (1947) |
Baby your skin Keep it fitter Or “baby” Will get Another sitter Burma-Shave (1959) |
|||||
| In every Half a pound My boy You get a ton Of Shaving joy Burma-Shave (1938) |
Speaking of Great events Burma-Shave Proudly presents Another fine product Burma-Vita Tooth Powder (1947) |
Don’t Try passing On a slope Unless you have A periscope Burma-Shave (1959) |
|||||
| Here’s the winning Shaving team The perfect blade The perfect cream Burma-Shave Blades Burma-Shave (1938) |
No soggy brushes In your grip You’ve always Got a Finger tip Burma-Shave (1947) |
Many a forest Used to stand Where a Lighted match Got out of hand Burma-Shave (1959) |
|||||
| Before I tried it The kisses I missed But afterward — Boy! The misses I kissed Burma-Shave (1938) |
We know How much You love that gal But use both hands For driving, pal Burma-Shave (1947) |
He lit a match To check gas tank That’s why They call him Skinless frank Burma-Shave (1959) |
|||||
| Sharpest blade Ever made Comfort speed Guaranteed 15 for 25 cents Burma-Shave Blades (1938) |
Santa’s Whiskers Need no trimmin’ He kisses kids Not the wimmin Burma-Shave (1947) |
If daisies Are your Favorite flower Keep pushin’ up those Miles-per-hour Burma-Shave (1959) |
|||||
| Say, big boy To go Thru life How’d you like A whiskered wife? Burma-Shave (1938) |
When the stork Delivers a boy Our whole Darn factory Jumps for joy Burma-Shave (1947) |
Said farmer Brown Who’s bald On top Wish I could Rotate the crop Burma-Shave (1959) |
|||||
| No lady likes To dance Or dine Accompanied by A porcupine Burma-Shave (1938) |
Join Our happy Brushless throng Six million users Can’t be wrong Burma-Shave (1947) |
The one who Drives when He’s been drinking Depends on you To do his thinking Burma-Shave (1959) |
|||||
| After one trial You’ll want more At the next Good drug store 15 for 25 cents Burma-Shave Blades (1938) |
As you drive Play this game Construct A jingle With this name Burma-Shave (1947) |
Don’t leave safety To mere chance That’s why Belts are Sold with pants Burma-Shave (1959) |
|||||
| Cheek to cheek They meant to be The lights went out And so did he He needed Burma-Shave (1938) |
Prices rising O’er the nation Here is one That missed Inflation Burma-Shave (1947) |
The poorest guy In the Human race Can have a Million dollar face Burma-Shave (1959) |
|||||
| Fire! Fire! Keep cool Be brave Just grab Your pants and Burma-Shave (1938) |
That she Could cook He had his doubts Until she creamed His bristle sprouts with Burma-Shave (1947) |
This will never Come to pass A back-seat Driver Out of gas Burma-Shave (1960) |
|||||
| The time To start A real dispute Is when you’re Offered a substitute Burma-Shave (1938) |
A big Improvement Since the war Is now on sale In your drug store Burma-Shave (1948) |
Forest fires Start from scratch So think before You toss That match Burma-Shave (1960) |
|||||
| After one trial You’ll want more At the next Good drug store 15 for 25 cents Burma-Shave Blades (1938) |
Road Was slippery Curve was sharp White robe, halo Wings and harp Burma-Shave (1948) |
Henry the Eighth Sure had Trouble Short term wives Long term stubble Burma-Shave (1960) |
|||||
| Darling I am Growing old Nonsense! Do as you Are told — get Burma-Shave (1939) |
From New York town To Pumpkin
Holler Still Half a pound For half a dollar Burma-Shave (1948) |
Others claim Their product good But ours Does what You think it should Burma-Shave (1960) |
|||||
| Spread it on And lightly too Shave it off That’s all You’re through Burma-Shave (1939) |
The more You shave The brushless way The more you’ll be Inclined to say– Burma-Shave (1948) |
Use our cream And we betcha Girls won’t wait They’ll come And getcha Burma-Shave (1960) |
|||||
| At crossroads Don’t just Trust to luck The other car May be a truck Burma-Shave (1939) |
A man who passes On hills and curves Is not a man Of iron nerves– He’s crazy! Burma-Shave (1948) |
Dear lover boy, Your photo came But your doggone beard Won’t fit The frame Burma-Shave (1960) |
|||||
| Hardly a driver Is now alive Who passed On hills At 75 Burma-Shave (1939) |
I’ve read These signs Since just a kid Now that I shave I’m glad I did Burma-Shave (1948) |
This cream Is like A parachute There isn’t Any substitute Burma-Shave (1960) |
|||||
| A whiskered gent At a bazaar Paid for A kiss But got a jar Burma-Shave (1939) |
Regardless of Political views All good parties Always Choose Burma-Shave (1948) |
Henry the Eighth Sure had Trouble Short term wives Long term stubble Burma-Shave (1960) |
|||||
| Careless driving Soon we hope Will go The way Of brush and soap Burma-Shave (1939) |
Hat and tie Smart and clean Space between Spoiled the scene He should use Burma-Shave (1948) |
Dim your lights Behind a car Let folks see How bright YOU are Burma-Shave (1960) |
|||||
| Careless Bridegroom Dainty bride Scratchy whiskers Homicide Burma-Shave (1939) |
Substitutes and Imitations Send ’em to Your wife’s Relations Burma-Shave (1948) |
Bristles scratched His cookie’s map That’s what Made poor Ginger snap Burma-Shave (1960) |
|||||
| Special seats Reserved in hades For whiskered guys Who scratch The ladies Burma-Shave (1939) |
Little Bo-Peep Has lost her Jeep It struck A truck When she went to sleep Burma-Shave (1948) |
Dear lover boy, Your photo came But your doggone beard Won’t fit The frame Burma-Shave (1960) |
|||||
| Christmas comes But once A year One swell gift That’s always here Burma-Shave (1939) |
The midnight ride Of Paul For beer Led to a Warmer hemisphere Burma-Shave (1948) |
Drowsy? Just remember, pard That marble slab Is doggone Hard Burma-Shave (1960) |
|||||
| Mirror on The bathroom wall What’s the Smoothest shave Of all? Burma-Shave (1939) |
Speed Was high Weather was not Tires were thin X marks the spot Burma-Shave (1948) |
Thirty days Hath September April June and the Speed offender Burma-Shave (1960) |
|||||
| Past Schoolhouses Take it slow Let the little Shavers grow Burma-Shave (1939) |
At school zones Heed instructions! Protect our little Tax deductions Burma-Shave (1948) |
We’ve made Grandpa Look so youthful His pension board Thinks He’s untruthful Burma-Shave (1960) |
|||||
| Shiver my timbers Said Captain Mack We’re ten knots out But we’re turning back I forgot my Burma-Shave (1939) |
Highways are No place To sleep Stop your car To count your sheep Burma-Shave (1948) |
Statistics prove Near and far That folks who Drive like crazy –Are! Burma-Shave (1960) |
|||||
| Drive like A railroad engineer Take it easy When the road’s Not clear Burma-Shave (1939) |
Bargain hunters Gather ’round For fifty cents Still Half a pound Burma-Shave No price increase (1948) |
Tempted to try it? Follow your hunch Be “Top Banana” Not one Of the bunch Burma-Shave (1960) |
|||||
| At crossroads Don’t just Trust to luck The other car May be a truck Burma-Shave (1939) |
It’s not How fast or slow You drive The question is How you arrive Burma-Shave (1948) |
If our road signs Catch your eye Smile But don’t forget To buy Burma-Shave (1960) |
|||||
| The queen Of hearts Now loves the knave The king Ran out of Burma-Shave (1939) |
The boy who gets His girl’s applause Must act Not look Like Santa Claus Burma-Shave (1948) |
Ben Met Anna Made a hit Neglected beard Ben-Anna split Burma-Shave (1960) |
|||||
| Hardly a driver Is now alive Who passed On hills At 75 Burma-Shave (1939) |
A man A miss A car–a curve He kissed the miss And missed the curve Burma-Shave (1948) |
Bristles scratched His cookie’s map That’s what Made poor Ginger snap Burma-Shave (1960) |
|||||
| I proposed To Ida Ida refused Ida won my Ida If Ida used Burma-Shave (1939) |
The minutes Some folks Save through speed They never even Live to need Burma-Shave (1948) |
If your peach Keeps out Of reach Better practice What we preach Burma-Shave |
|||||
| If you dislike Big traffic fines Slow down ‘Till you Can read these signs Burma-Shave (1939) |
A man who passes On hills and curves Is not a man Of iron nerves– He’s crazy! Burma-Shave (1948) |
She put A bullet Thru his hat But he’s had Closer shaves than that Burma-Shave |
|||||
| Soap’s That irritate Their mugs Turn jolly gents To jitterbugs Burma-Shave (1939) |
Whiskers Easy come, You know Why not make them Easy go? Burma-Shave (1948) |
Listen birds These signs cost money You can rest awhile But don’t get Funny Burma Shave |
|||||
| Shaving brushes Soon will Be trimmin’ Those screwy hats We see on wimmin Burma-Shave (1939) |
Look Don’t listen Pop is trying A substitute Instead of buying Burma-Shave (1948) |
When Super-shaved Remember, pard You’ll still get slapped But not so hard Burma-Shave |
|||||
| Christmas comes But once A year One swell gift That’s always here Burma-Shave (1939) |
We don’t Know how To split an atom But as to whiskers Let us at ’em Burma-Shave (1948) |
The poorest guy In the Human race Can have a Million dollar face Burma-Shave |
|||||
| Darling I am Growing old Nonsense! Do as you Are told — get Burma-Shave (1939) |
If you think She likes Your bristles Walk bare-footed Through some thistles Burma-Shave (1948) |
If Wifie shuns Your fond embrace Don’t shoot the iceman Feel your face Burma-Shave |
|||||
| Drive like A railroad engineer Take it easy When the road’s Not clear Burma-Shave (1939) |
Wild men pulled Their whiskers out That’s what made Them wild No doubt– Burma-Shave (1948) |
Late risers! Shave in just 2 minutes flat Kiss your wife grab your hat Burma shave |
|||||
| Try a tube The cream That’s in it Is making friends A man a minute Burma-Shave (1939) |
Why work up A daily lather Once you’ve tried We’re sure You’d rather Burma-Shave (1948) |
If you pass On the yellow line Hope the funeral Is yours Not mine Burma-Shave |
|||||
| A peach Looks good With lots of fuzz But man’s no peach And never wuz Burma-Shave (1939) |
Just this once And just for fun We’ll let you Finish What we’ve begun ? ? ? (1949) |
Shaving brush, Was like old Rover. When he died, He died all over. Burma Shave |
|||||
| Prickley Pears Are Picked for Pickles But no Peach Picks A Face that Prickles Burma Shave |
With A sleek cheek Pressed to hers Jeepers! Creepers! How she purrs Burma-Shave (1949) |
A nut at the wheel A peach on his right A curve in the road Fruit salad that night Burma Shave |
|||||
| No use Knowing How to pick ’em If your half-shaved Whiskers stick ’em Burma-Shave |
He always used A steaming towel And mug and brush And language foul ‘Til he tried Burma-Shave (1949) |
Diplomacy Is To Do And Say The Nastiest Things In The Nicest Way Burma Shave |
|||||
| To kiss A mug That’s like a cactus Takes more nerve Than it does practice Burma-Shave |
Some Burma-Shave The school boy
cried At least I’ll smell As if I tried Burma-Shave (1949) |
Snake rail fences And old log houses Both were built, To keep out the cowses Burma Shave |
|||||
| Hardy men Were the Caesars Instead of razors They used tweezers Burma Shave |
When frisky With whiskey Don’t drive ‘Cause it’s Risky Burma-Shave (1949) |
These three Prevent most accidents Courtesy Caution Common sense Burma-Shave |
|||||
| In seventy years Of brushin’ soap on Gramps coulda painted The pentagon Use brushless Burma-Shave |
If you Must sample Her “pucker paint” Better drive Where traffic ain’t Burma-Shave (1949) |
He always used A steaming towel And mug and brush And language foul ‘Til he tried Burma-Shave |
|||||
| Men Who have to Travel light Find the handy tube Just right Burma-Shave |
Since hubby Tried That substitute He’s 1/3 man And 2/3 brute Burma-Shave (1949) |
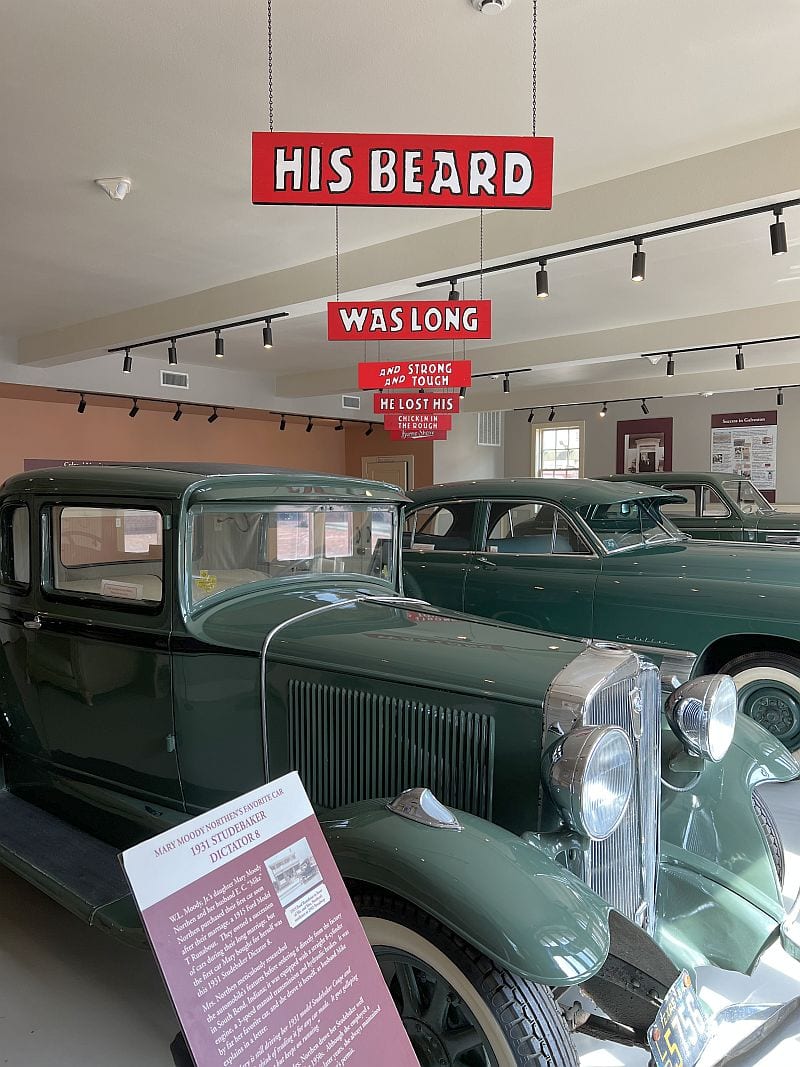
His beard Was long And strong and tough He lost his Chicken in the rough Burma-Shave |
|||||
| Said one whisker To another Can’t get tough With this stuff Brother Burma-Shave |
Old Dobbin reads these signs Each day You see, he gets His corn that way Burma-Shave (1949) |
Pull off The road To change a flat Protect your life– No spare for that! Burma-Shave |
|||||
| Leap year’s over You’re safe, men All you cowards Can shave again With brushless Burma-Shave |
It gave Swell shaves before Now you’ll like it Even more The new–improved Burma-Shave (1949) |
Ashes to ashes Forests to dust Keep Wisconsin green Or we’ll All go bust Burma-Shave |
|||||
| With television On the set Stars are Running out To get Burma-Shave (1949) |
His beard Was long And strong and tough He lost his Chicken in the rough Burma-Shave (1949) |
To soothe And smooth Your tender skin It’s now improved With lanolin Burma-Shave |
|||||
|